
Although I haven’t talked about my Rubik’s Cube solution for awhile now, I recently dug out my cube and tried to solve it by memory – and succeeded. Slow, but successful, so I’m quite pleased.
Of course, what better way to showcase your solved Rubik’s Cube than with a fancy stand? Although eBay sells nice plastic stands that tilt the cube for best effect (see the listings below), I recently read how to make my own out of cardboard.
 Here’s how:
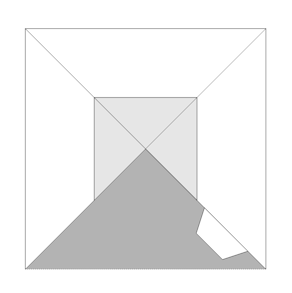
- Draw a perfect square on a piece of paper, then another one centered inside it (see diagram.)
- Cut out the dark gray area (and optionally the light gray area too.)
- Crease the lines and bring the tab to the other side, causing the paper to form a pyramid.
- Glue the tab to the side, and add a cube to display.
Some thoughts about the design:
- The center light gray can be cut out or kept – if kept, bend it so it folds into the stand, forming a pyramid-shaped “cup” for the cube to rest in. This adds a bit of strength to the stand.
- Since the ‘dip’ cannot be deeper than the stand, you’ll understand why the center square cannot be larger than the edges (mathematically, the width of the inner square must be less than 1/2 the width of the larger square.)
- Secure the tab well with glue or staples – as the Rubik’s cube rests, it is in effect a wedge trying to split the stand apart. A very light wedge, true, but it puts pressure on the stand, so secure it well.
- Another variation is instead of a table, the dark gray area is kept, and then glued/stapled directly behind one of the other sides as a large “tab.” This gives more surface for the glue, and more stickability.
- Try a few out with paper to get the feel for it (and pick a size) and then make one in cardboard.
Enjoy!