Here’s (One Way) How You Wait For An Image To Load In Javascript

Tinkering with some Javascript for the header on Gwen’s art page, I came across an interesting point – what do you do if you want to run a script as soon as an image is loaded?

Some of the issues:

  • Your browser can load parts in whatever order it wishes – so if your Javascript file loads before your image, you’re too soon.
  • If you try to use an onload event in Javascript, they don’t always work – specifically, if the image is already in the browser cache, you won’t have the event fire.
  • If you DO use an event, and the image is loaded before the Javascript is loaded, then the event fires with no code to react to it.
    Philosophical Question: If an image of a tree loads in a browser and no jquery is around to respond to the .onload, does it count?
  • If you set an arbitrary time limit to ‘wait and see’, there’s always going to be a slow connection out there that takes even longer.
  • And once you move to more complicated web pages (for example, frameworks like WordPress) you have even less control over when and how your Javascript will be loaded and run.

The comic below makes fun of ‘wait and see’ programming:

commitstrip.com

However, here is one solution, using the <img> onload event (which in testing seems to fire on all occasions):

  • Put the images you need as <img> tags in the HTML of your page. You can hide them with CSS tags (visibility:hidden; display:none;) if necessary.
  • In the page’s <head> section, add this javascript:
    <script type="text/javascript">
    var loadingFlags=[1,1];
    function setLoadingFlags(i){loadingFlags[i]=0;}
    </script>

    For each image, decide on an index (making sure ‘loadingFlags‘ has enough entries to handle them all), and then include them with an onload handler:

    <img src="imgA.gif" id="myimg0" onload="setLoadingFlags(0)" />
    <img src="imgB.gif" id="myimg1" onload="setLoadingFlags(1)" />

    …etc.

  • Now your Javascript can run anywhere,anytime, since the <img> onload is always called, whether in the cache or not. Until these flags are zero, they aren’t loaded. This makes your Javascript easier, since you don’t have to worry about sequencing:
    function processImages()  
    {
      if ( loadingFlags[0] || loadingFlags[1] )
      {
        // check often until loaded
        window.setTimeout(processImages,50);
        return;
      }
      // both found - do your work
    
    }
  • As long as the call to load this Javascript comes after the variable setup in the HTML, you should be OK, since it will just call over and over until both flags are set to 0 via onload.
  • Need to reload images? The ids are added to the <img> tags in the example above for just that reason. You set the flags again to 1, change the .src address, and then poll until they turn to 0.
    function loadSomeMore()  
    {
      loadingFlags[0]=1;
      document.getElementById("myimg0").src="imgX.gif";
      loadingFlags[1]=1;
      document.getElementById("myimg1").src="imgY.gif";
      window.setTimeout(processImages,50);
    }

Some cautions:

  • The example code here uses two images, but the idea can be limited to 1, or expanded to as many as necessary. Of course, lots of large images loading in the background all at once will to endear you to visitors, So take note of your bandwidth!
  • If an image doesn’t load (broken link for example,) then you’ll need a plan for what to do next. For example, use a counter to check how long the wait has been, and do something else if the images don’t load.
  • In theory (and testing) the <img> onload is reliable. But like loading, there may be a failure. Always plan for what to do if this happens, and try to have a test routine in place.

Although this code won’t solve every issue, it might help with the occasional synchronization issues between .js and .html files. Hope it helps!

What I like About C/C++

The last article mentioned VB .net and its plusses (!) – now it’s time for why I like C/C++:

  • It has longevity. 45 years old and still in use. Will we be saying that about many languages today? So it’s an investment in code (and education) that will last and last and last.
  • It’s ubiquitous. You need code? You can usually find a C version of it – quick. And if you ever read those programming indexes, you’ll know that while the big news is how much Haskell or Erlang or Rust or Swift has grown over the last month, few people talk about the perennial favorite always near the top – guess who?
  • It’s fast. With fast computers, speed isn’t the issue it was twenty years ago, but there’s always a need for faster code somewhere. One of my favorite things is to take a code routine that I need faster, and tweak it. For C it’s a real treat. You feel that you are making a difference. Even ++i versus i++ has a performance penalty associated with it. For “coding to the metal” (when necessary) it’s great.
  • It’s the grandfather/greatuncle to just about every language. Javascript? Python? PHP? Java? Drop down into any of those code bases and it will seem familiar right away (not perfect – but familiar.) Arguably, I’d say that a good foundation in C++ will make most of the popular languages easier to ramp up on.
  • It low level (if you want). Want high level features like collections? Bring in the STL. Need a GUI? Pull in a library like GTK or Cocoa. But you can still tweak a routine or two when needed – a great combination of high/low level performance you won’t find easily elsewhere. In fact, when I need performance in a VB program, I’ll still code the occasional C DLL to handle it.
  • It has portability. When I wanted to program the microcontroller device Arduino, guess what? The tool chain was in C. Easy peasy to do my first programs, and I could even reuse code from elsewhere. The result was a very fast rampup.

This just scratches the surface. I’m glad I have had exposure to a number for programming languages, but I’m grateful I got a training in C early on. And despite all the new languages coming out almost daily, I expect to program in C for quite awhile…

What I like About Visual BASIC .net

I admit I’ve used BASIC my whole life in one way or another. As a kid, it came on all the computers. As an adult, Microsoft’s Visual BASIC 6 was a revolutionary way to design Windows programs. And today, VB is the ‘other way’ to program in .net – not as hot as C#, but perfectly usable.

And better, I believe – here’s why:

  • Syntax. I like C’s terse syntax. But sometimes I tire of adding ‘;’ after everything. And I didn’t realize that until I had worked in VB .net for awhile. And having the IDE manage the formatting, while a tad controlling, saves me space-space-spacing to reformat lines all the time (and yes I know most everyone has a prettyprinting option in their IDE, but it’s funny how often “don’t bother using it – it’s just one line” pops up in coding…)
  • Case insensitive. It seems small, until you use it for awhile. If I create a variable called “buffLen”, I can write “bufflen” everywhere, and the IDE will automatically adjust it to “buffLen”. Like the “;” key, not having to hit the shift key is noticeable when I go back to C.
  • It gets the job done. Don’t get me wrong – I like C/C++ and I’ve done most of my development in it. But whereas C can feel like tuning a high performance car at times, VB feels like popping into the van for a trip to the store. You still need to change the oil – but one takes a lot less effort to do things with. And for most programming tasks, just getting it done is fine. For example, GUIs work at human speeds – so is the extra performance of hand-tuned C worth it in that case?
  • The IDE. This should be multiple points, but the Microsoft IDE makes it very easy to program VB. Start typing, and it prompts with the obvious choice. Can’t remember that object’s function name? Press the period, and a list pops up. Same for variables. And I’ve already mentioned the autoformatting and variable case insensitivity.
  • It’s portable(ish) A huge benefit of C is portability. With Microsoft’s foray into Linux, Mac, and Handhelds (via Xamarin) the knowledge of .net is leveraged. Time will tell if they extend support for VB, but let’s hope.

I’m not a fan of propriety languages, but the convenience of VB for projects has me moving to it as my goto language for little glue programs in my work. It’s faster to prototype and test, gives me a GUI simply, and has a very good collection of collections (lists, dictionaries, etc) so I get small apps up and running quickly.

You may disagree – but choice is the spice of life, so perhaps you’ll prefer the next article, where I discuss C/C++ and why I like it – because I can have two (or more) favorites…

NAB Win #3 – iTunes And Radio Automation For the Win!

I heard from the DJB team at NAB this year – that’s win #3 for one of their products!

To put it in perspective, over the past 5 years that’s been 3 awards for software I’ve worked on:

  • 2013’s Radio Spider, which aggregates files from the Internet or over a server, including cloud (Dropbox/Google Drive)
  • 2014’s DJB Logger, a multiple stream recording device (hardware/Internet stream) for logging radio content for archiving, competition monitoring, or whatever. The current version is now up to 24 channels simultaneously.
  • 2017’s iBroadcaster, a new twist on Button Broadcaster Pro in that it uses the iTunes database for its library, rather than its own.

So that’s me programming three award-winning programs in 5 years – I really have got to update my resume…

How To Name The Day of the Week for Any Date – FAST (Part 2)

In part 1 we saw how to figure out any day of the week for 2017, just by adding two numbers. Fast, powerful, and (for the nerdishly inclined) very cool.

But 2017 will pass, and sooner or later someone will want to know the day they were born, or something else non-2017ish – then what?

The reason I started with 2017 is that it is a gradual introduction into the full calculation, which can have as many as six steps, versus the two needed for this year:

  1. Add a century year offset value.
  2. Add the non-century years (65 for 1965, 12 for 2012, etc.)
  3. Add the leap years (non-century years divided by 4, ignoring the fractions.)
  4. Subtract 1 if the year is a leap year, AND the date to consider is in Jan. or Feb.
  5. Add the month number.
  6. Add the date number.

For simplicity, you’ll take this final number and subtract 7s from it, until you have a number from 0-6.

Let’s look at November 15, 2017 again, which we determined in Part 1 was a Wednesday:

  1. Add a century year offset value. For 2000-2099, the value is 0.
  2. Add the non-century years (17 for 2017.) So we are at 0+17=17.
  3. Add the leap years. 17/4=4.25, so we use only the 4. 0+17+4=21.
  4. Subtract 1 if the year is a leap year… Not a leap year, so: 0+17+4+0=21
  5. Add the month number: 2 for November, so 0+17+4+0+2=23.
  6. Add the date number, 15th, so 0+17+4+0+2+15=38.

Take 38, and reduce it by removing 7s: 38 is 35+3, or (5*7)+3, so we get rid of the 7s, and end up with 3, or Wednesday.

See why 2017 is so simple? The first four steps end up with 21, which is evenly divisible by 7. So we skip them, and just do the final 2, and then get rid of the 7s.

And if it is a date in the 2000s, and not a leap year, we still skip steps 1 and 4.

Well, then, what about a hard date? Say, a leap year last century, like January 29th, 1988?

  1. Add a century year offset value. For 1900-1999, the value is 1.
  2. Add the non-century years, so we are at 1+88=89.
  3. Add the leap years. 88/4=22, so we get 1+88+22=111.
  4. Subtract 1 if the year is a leap year, AND the date to consider is Jan. or Feb. So we get 1+88+22-1=110.
  5. Add the month number. 6 for January, so 1+88+22-1+6=116.
  6. Add the date number. 29th, so 1+88+22-1+6+29=145.

145 is 140+5, or (20*7)+5, so we get rid of the 7s, and end up with 5, or Friday.

Six steps, and you’ve got the day of the week for two centuries’ worth of dates!

(One caution – 1900 is a special case, and NOT a leap year, so January 1, 1900 is a Monday, not a Sunday – try it and see. But 2000 IS a leap year – that’s calendars for you!)

But even with six steps there is a fair amount to keep track of and do in the head. I tend to follow these steps like this, for example using July 12th, 1979:

  1. Add the leap years. The hardest part of the calculation is the divide by 4, so I do this first, by dividing by 2 twice and throwing away the fraction. So, 79/2 is 39.5 or 39, and 39/2 is 19.5 or 19. Another trick is I can throw away the sevens anytime to keep the total small, so 19-7-7=19-14=5.
  2. Add the non-century years, so add 79. From 79 I can immediately remove 77 (11*7) so I get 2, for a total of 5+2=7. Another 7! So I throw that away and get 0 so far (another way to look at it is 5+79=84, which is 12*7, so I end up with 0 this way as well…)
  3. Add a century year offset value. For 1900-1999, the value is 1. 0+1=1.
  4. Subtract 1 if the year is a leap year… Nope for 1979, so still 1+0=1. (Hint: If you had any fractions when doing the first step, it wasn’t a leap year.)
  5. Add the month number. 5 for July, so 1+5=6.
  6. Add the date number. 12th, so 6+12=18=14+4=7+7+4. Take away the 7s and the end result is 4, or Thursday.

Practice a bit, and you’ll see how easy it is to calculate the day of the week for any date. And even if you don’t use it often, you’ll find yourself paying attention to the day of the week more, and being able to answer questions like “what day was the 19th?”

And of course, with a teeny bit of effort, you’ll be able impress people by telling them the day of the week they were born and many other dates…

How To Name The Day of the Week for Any Date – FAST (Part 1)

What day of the week is March 1, 2017? November 15, 2017? August 22, 2017?

2017 is a very special year – it makes day of week calculations easy-peasy, and opens the door for doing it for any day – any year – or any century.

Tempted to try? Then just look at this list of 12 numbers:

6 2 2 5 0 3 5 1 4 6 2 4

Let’s put them in context:

6 January
2 February
2 March
5 April
0 May
3 June
5 July
1 August
4 September
6 October
2 November
4 December

How it works: Each number after January’s is the offset in the calendar for the next month, modulo 7 (or, wrapping around weekly, where 6 is Saturday, and 7 becomes 0, which is Sunday, then 1 for Monday, etc.) Take June (3) which is 30 days, or 7+7+7+7+2 – the 7s don’t count (Wednesday plus 7 days is still Wednesday – get it?) However the 2 does count, so the number for July is the 3 for June plus the extra 2 days, or 5. And as January shows, you wrap around from 6 to 0 – January has an extra 3 days, and 6+3=9, which you fix by subtracting 7, to get 2. Using this and the number 6, we can create this whole list ourselves, but it pays to memorize it. Note we also use the ‘normal’ February, which is 28 days, no no extra to add to March, so it remains 2 as well.

And 2017 is special because the year started at 0 (Sunday.) Put that together and we have very simple calculations by adding this ‘Month Number’ and the date of the month:

  • January 1, 2017? January is 6, plus 1 for the first is 7. subtract 7 (days always run from 0=Sunday to 6=Saturday) and we get 0, or Sunday.
  • March 1, 2017? March=2 + 1st=3, which is Wednesday.
  • November 15, 2017? November=2; 2+15=17; keep removing 7s until we get 3, which is Wednesday again.
  • August 22, 2017? August=1; 1+22=23, which is 7+7+7+2; throw away the 7s, and we get 2, or Tuesday.

What makes the calculation so simple is that 2017 starts on a Sunday, so very little math is needed – add the Month number and Month’s date, and throw out the sevens to get a day. It also works for any non-leap year year that starts on a Sunday, such as 2023 and 2034.

Of course, once you’ve had some practice, you probably don’t want a trick you get to use only one or twice a decade. So how to expand on this to get the day of the week for any date? Tune in to tommorrow’s part 2 for more…

The Audrey Braille Display, and a Plan to Build It Faster

(PLEASE NOTE – The Patreon page mentioned here is deactivated until further notice)

If you could help someone, what would you do for them?

Almost everyone would talk about helping someone cross the street, or giving a cheery hello to brighten their day, or donating to a worthy cause.

I feel similarly. It’s why I started the Audrey Braille Machine in 2011. A device to turn digital text into Braille patterns that a blind person could feel with their fingers.

Being a programmer for most of my life, the software was never an issue. But hardware was. So I taught myself the Arduino open source hardware and electronics so I could ‘drive’ the project (you can read my articles here.) And I used that knowledge to build smaller projects to help the Blind (examples here, here and here.) Eventually, I learned enough to teach an Arduino course at the local Makerspace.

But despite all that, the Braille Display project moved along slowly. In one way, it was a blessing; I was able to evaluate different designs, so I didn’t go down a blind alley too soon, and eventually created my best design yet, a small embossed wheel (details here.) On the other hand, the blind were not benefiting from an unfinished project…

Then I came across Patreon.com and had an idea. Briefly, the site allows people to donate to a cause or project. Patrons pay, and you give them something for their contribution, usually monthly. It’s a great way to test an idea, to see if you can raise enough interest or not.

But unlike most of them, I’m not a painter or designer or writer giving people my creative work. So at first I wasn’t sure of the fit.

Then I realized – what I REALLY wanted were patrons to encourage me. Simply put, their donation confirms that someone else thinks this is a good idea. And thanking them for their support and confidence would in turn inspire me to work faster on the project.

So I did it – I opened a Patreon offer (currently inactive.) For $5 a month, you tell me if you think the Braille display will make the world a better place. In turn, I will give you progress reports and more each week, and anything else I can think of to keep you in the loop.

I also plan to make everything Open Source, so others can riff off the ideas and implement better and better versions – and ultimately, with the blind benefiting. If you’ve heard about Linux, then you know the power of many people focusing on an Open idea…

My goal is to get at least 100 people involved – and give back 50 hours of work per month on this project. While that ends up being less than a minimum wage (actually, far less, since I’ll likely spend most of it on equipment and parts), it was never about the money.

I want to help. And I think you do too, or you likely wouldn’t have gotten this far in my post. Make no mistake; your support will be fundamental in making this project happen, so join me on Patreon, and let’s make a difference.

(PLEASE NOTE – The Patreon page mentioned here is deactivated until further notice)

The Audrey Braille Display, 2017

It’s 2017 – so how is the Braille Display going?

In a nutshell, alive and well – but moving very slowly along.

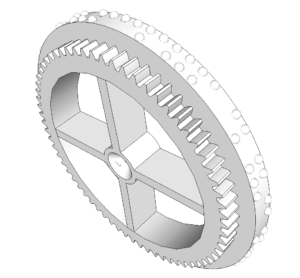
The design has evolved from the original rack and pinion to a wheel design. The wheel combines all 64 possible braille cells patterns into a 64-row wheel about 2 inches across, which means a very compact design is possible. Each cell is driven by a single motor that turns in one direction, making the part count low (for example, no H-bridge for motor control – just a transistor.) Since a regular motor can be much cheaper than a stepper, the result is lower cost – in fact, I’ve estimated I can build it for under $200 for a 20-character device.

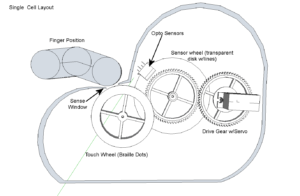
In practice, an Arduino will communicate with the computer via USB, and send signals to each motor for positioning. By turning the wheels precisely, any given pattern can be placed under a sensor window, to be touched by the finger.

And three wheels per cell? Packing things together makes for a very tight design. If I had a machine shop that could adhere to ultra precise tolerances for parts, I could possibly fit every cell into a single wheel/gear. But I’m working with a 3D printer, requiring quite a bit more ‘slop’ in the design. Using three gears per cell allows the motors, sensors, and braille wheel to fit together in a design and not get in the way of each adjacent cell.

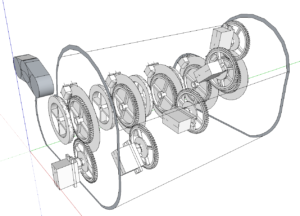
In any case, the videos below give more details and some insight as to the current state in early 2017 – please excuse the quality.

Right now, the main problem is positioning. Turning the wheel means setting the wheel to one of 64 possible positions, and within 1/2 millimeter or so of each position, for practical use.

So while I am still moving along with it, and ironing out kinks, I thought it was worthwhile at this time to get a progress report out on the Internet.

VIDEO 1: Audrey Braille Display – Cell Design

A first prototype of a single Braille display cell using the three gears, one for driving, one for the positioning sensor, and the third for the Braille pattern. Using three wheels allows the cells to be positioned closer together, since the drive motor would get in the way of adjacent cells if it was in the same position for each cell; instead, it can be alternately positioned high and low and still drive the cell.

VIDEO 2: Audrey Braille Display – First Test of Character Positioning

Testing the character positioning accuracy by sending the same character 10 times to the cell, and checking if the rest position varies each time. As a simple visual test, I’m using the single mark on the sensor wheel that marks a full turn of the wheel – it should appear in the same spot for all ten character displays, and if not, means the positioning needs more work (spoiler alert: the positioning needs more work.) However, for a first try with quick and dirty Arduino code I’m happy with the results…


It’s Getting Chilly Out There – So Get Chili In Here…

But first, a Haiku:

Foodie conundrum –
Heats us in wintertime, yet
We call it ‘chili’

As the Missus finishes up her second novel (#2 in the Plant Lady Mystery series – quick plug here) I wanted to do something to free up her time. So I looked around for meals that I could do simply and easily (key for me).

The result is what I’m going to call Dave’s Drop Dead Default Chili:

  1. Put equal sized cans of beans and tomatoes in a pot
  2. Add chili powder to taste – level teaspoon per pair of cans is a good start
  3. Bring heat up slowly to a bubbling boil, then turn down and let simmer

I told you it was simple. Want a lot? Combine four cans of tomatoes and four cans of beans (I prefer kidney beans for the first can, but cannellini, pinto, and black beans have all worked so far.) Want a little? one can of each. Thick? Use tomato paste. Thin? Use whole or diced tomatoes.

This is a basic, simple to make chili – and once you have this down pat, there are many ways to enhance it:

  • I’m a vegetarian, but it shouldn’t be too hard to add meat – fry up some ground hamburger and add it, or cook up and slice in hot dogs (or just let them cook in the chili.)
  • I like to add oil to the pot and put in some diced onions first – cook them on medium heat until they just turn translucent, so that they are still a bit crunchy. I use one of those chopper gadgets to make the onion bits very small, cook some, and let the rest be a garnish (this was Gwen’s suggestion.)
  • My current variation is to add a lot of heat. I take a large jar of banana peppers in water, and split it into two portions for two batches, each with half the water and half the peppers. Then I add the 1/2 jar of ‘hot’ water along with the peppers diced into small pieces.
  • You can also add rice. A small amount of white rice added near the end cooks up nicely; you serve when the rice is soft. A big advantage is that rice+beans ends up providing all the protein building blocks your body needs. Called a Complete Protein, it’s useful for vegetarians who look for non-meat sources for protein.
  • Another alternative for rice: As I found out in one batch, rice needs 2X the water by volume to cook. So add too much to the chili and you end up with a a sludge or stew. Not to worry though, since that makes a great filling for tacos – just add a dollop of sour cream each (organic of course). Alternately, you can cook the rice separately, and pour chili over it for that complete protein benefit.
  • You can go all out – I actually got the original recipe from Joe Cross’s site, where the beans are soaked overnight along with many, many steps and ingredients. I really liked the recipe, but the fact is, if it requires too many steps, it won’t get done, so better canned beans and a hearty meal or two a week, than soaking beans and making a fancy dinner only once a month.

So far, I can make big batches that last three days and allow freezing of the extra. For that, it’s two big cans (28oz) of Tomato paste and whole tomatoes, along with 4-5 regular sized (14oz) cans of each type of bean. A 1/2 jar of pickled banana peppers gives it the perfect heat.

Give it a try – something this easy makes for a great last minute meal, and tastes far better than the simplistic recipe suggests. And it gives your other half time to work on her novel…