
One thing I wanted to do this year for my blog was to enhance the photos. After reading some articles on product photography (including a great tutorial from the Adafruit website) and far too many books on proper digital photography, I’m ready (more or less). However, despite my hope I can properly compose a shot, one thing has eluded me till now – lighting the indoors well. It turns out to not be simple, and in researching it, I realized much of the problem is that typical lighting for photography is non standard and expensive.
Good news: You can do indoor or product shots on a budget and with good lighting – here’s some tips I’ve discovered to help you:
- Enough Lighting. Obviously, I’m not going to buy the 300 watt floor lights that a real studio uses. Fortunately a much more affordable solution using CFL (compact florescent lights) is possible. Roughly speaking, it’s about a 4:1 ratio for lighting, so a 13 watt compact florescent gives about the same light intensity (called lumens) as a 40 watt ‘normal’ bulb, and 75 watts of CFL equals about 300 watts of ‘pro’ lighting (all values approximate).
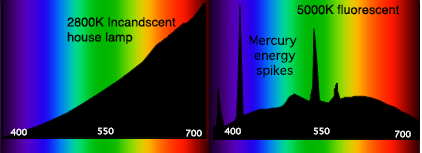
- The Right Lighting. I’ve already tried lighting photos with CFLs in the past – with poor results. It turns out there’s a reason my home lights didn’t do the job – the light they produce is not evenly spread across the spectrum, but has hot spots, sections (colors) that are better lit than others. That’s why often blues and greens come out better than reds for example, as this article – with plenty of photos – shows. The difference in ‘even’ lighting and CFLs is shown in this chart:
 Ultimately, the kind you want are called “full spectrum” and they do make a difference (I got mine here in Canada via Amazon.ca, called “CanadianStudio Pro 45W CFL 5500K 91 CRI“).
 - The Right Support. You can buy floor tripods and such and spend a lot. At a minimum, you’ll need one or two (as the article I mentioned at the beginning points out, you can actually take good shots with only one or two lamps). In my case, I use cheap gooseneck desktop clamp lights that I picked up at Walmart for $10 each, and screw the CFLs into them. I can clip them anywhere around the desk’s edge (so less clutter on the floor), position them exactly where I want to get a good angle, and then snap away. Another benefit: Even the cheapest lamp will be rated for enough wattage for a CFL to work fine. Just be careful screwing them in and be very careful about breakage, as they contain mercury.
- Even Lighting. Ever tried to light a shiny object? Then you’ll love a light box. Made of thin plastic, it diffuses the light that hits it, and makes the lighting inside more even, so it seems to appear from nowhere and everywhere. You get several color backdrops, and even a front panel with a slit to prevent reflections of the camera when shooting shiny objects. In my case, I had a large one I got for use shooting the Missus’ art, but I wanted a smaller desktop model for shooting electronics and Arduino parts. One from eBay at 16 inches across (40 cm) set me back very little money, and fits nicely on my table. Here’s one in action; and as a bonus, some tips for shooting products with it:
Lighting does make a difference in photos (as I’ve learned the hard way). Poor lighting is one of those things even the best digital art program has a tough time fixing (if it can). So it’s worthwhile to take time to set it up, and light it up right.