
For my latest Sitepoint article submission, I realized it was time to update my bio, including headshot. My last one was shot from a distance using a low-pixel camera, and let’s face it, years out of date (I did like looking younger, though). Now that I really needed a new/recent headshot, I felt it was time to bite the bullet and do it properly.
One catch: I am not an Adonis. In fact, I am Adonically-challenged. Cameras don’t like me, and I don’t like them. But, I’m not alone, and so for anyone looking to get the maximum headshot ‘bang’ with the minimum fuss, and keep costs low, I thought I’d explain how I got a reasonable headshot/portrait out there, without too much pain and sweat.
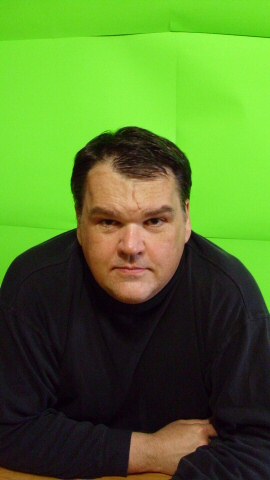
Step 1: Give up on the background. One of the most frustrating things I find with photos is where to pose. Professionals have a selection of artsy backgrounds you can pose in front of, but that’s out of the question for a one-off shot. My solution? A little digital magic, using a green screen background. I got ahold of several large sheets of florescent green paper, taped them behind me, and shot in front of that. The benefit is that I could ignore the background, focus on the headshot, and then digitally add a better background afterwards. For that, this website has a step by step guide to creating chroma-key photos with free software, and using green OR blue backgrounds.
Here’s my result:
|

|
If I was doing it again, I’d go for a neutral green over florescent, and preferably a neutral blue. Either color is OK to use with the Paint.net technique I used here, but reflections from green screens are harder to get rid of naturally (notice my final picture has a green background to hide this). Blue, even if some gets into the picture, blends in unobtrusively.
Step 2: Light right. The whole point of lighting is to direct people where you want them to look. So if you don’t like your neck, avoid putting a spotlight directly on it! In my case, I had my left side lighted from a window, an overhead light in the room, and a reflector for the right side (which provided a little less light there than I wanted, but still evened it out fairly well). Lighting is especially important across gender lines: most guides I read recommended men looking slightly down into the camera, and women slightly up in photos. If you follow that guide, you’ll need different lighting (and camera positioning) for each.
Step 3: A decent camera is your friend. Digital photos are cheap, so get as high a resolution as you can. You will be chopping down the photo, but starting with high resolution makes life a lot easier. As well, a good camera has a number of settings that can simplify shots, like adapting to lighting conditions, eliminating red eye, or lighting with different ‘colors’ (such as light, warmer, reddish lighting, or cooler blue lighting). And make sure you have enough memory. You will be taking a lot of photos to try to find the look you want, changing angles, lighting, clothing and much, much more. Keep batteries handy, too!
Step 4: Your photographer is also your friend. My wife took my shots. She is long suffering and kind, and I don’t deserve her. You’ll feel the same way after you’ve gone for a few dozen shots that don’t quite work. As you see photo after photo of mysterious oddball poses you don’t remember doing, you’ll need a morale boost; that’s when you’ll be glad you have a photographer to suggest different settings, changes like clothing and facial attitude, and much, much more. In fact, the shot I’m using was one of the last, proof that if you work at it, a good shot can come about!
Step 5: You favorite paint program is REALLY your friend! This is where the extra pixels come in handy. You can even out coloring, tweak the layout, crop, and even smooth the picture (don’t forget switching in the new background of course). Although my chroma-key trick uses Paint.Net, and you could probably use the program for your whole edit, I’m a big fan of Paintshop Pro, which is where I did the rest of my image processing. For those of you on a budget, Gimp is also a highly-respected and free paint program that will make it easy to finish off your picture.
These are just my experiences – yours will vary. But be prepared to take quite a few photos, and go through a lot of them to get a feel for what works. In my case, the turtleneck and pose was a last-minute change that surprised both of us by working well, and ended up being the photo I’m going with. Keep trying, and you’ll eventually find a ‘best of’ shot you can use as well.
One final point: remember the reason for your photos. If you’re about to start a fifty-city book tour for your million-seller novel, spring for a professional photo! Any photo you put out there reflects on you, likely for as long as the Internet exists (sadly). So if you need to put a professional foot forward, remember to spend some time getting the best shot, and also know when it’s time to call in a professional picture-taker. But if you can, it IS possible to do a reasonable job with a little effort, and some digital trial and error!