
As I mentioned in my other post on the best Rubik’s Cubes, I learned and then forgot how to solve a Rubik’s cube, so all that effort was down the drain. This time, I wanted a “braindead” solution, and a way to really remember it. The ol’ noggin pooped out once, might as well plan right for the next time…
This post contains the simplest solution I could come across to solve the cube. And stay tuned; after the solution, I’ll explain in the next post how to remember it easily.
By the way, the notation here is the ‘easy’ notation you see on some Rubik’s cube sites. All of them are based on facing one side of the cube, and moves made from that side. Here’s the notation:
![[A]](https://utopiamechanicus.com/img/rubik-a.png)
![[C]](https://utopiamechanicus.com/img/rubik-c.png)
![[D]](https://utopiamechanicus.com/img/rubik-d.png)
![[E]](https://utopiamechanicus.com/img/rubik-e.png)
![[F]](https://utopiamechanicus.com/img/rubik-f.png)
![[L]](https://utopiamechanicus.com/img/rubik-l.png)
![[M]](https://utopiamechanicus.com/img/rubik-m.png)
![[N]](https://utopiamechanicus.com/img/rubik-n.png)
![[R]](https://utopiamechanicus.com/img/rubik-r.png)
![[S]](https://utopiamechanicus.com/img/rubik-s.png)
![[T]](https://utopiamechanicus.com/img/rubik-t.png)
![[U]](https://utopiamechanicus.com/img/rubik-u.png)
![[V]](https://utopiamechanicus.com/img/rubik-v.png)
![[W]](https://utopiamechanicus.com/img/rubik-w.png)
As you can see from [L], you take the top three cubes and move them as one, turning the top ‘slice’ to the left (I’ll explain the letters below each later on in detail when it comes time to memorize…) [A] and [C] are turning the front group of nine cubes around, leaving the back pieces in place (called turning the face). Remember that each of these move icons are based on the side you are viewing at any given time.
Now on to the solution:
 Step 1 & Step 2: Solve the Cross and then Solve the Corners. Most sites don’t give exact steps for these, as they are pretty simple. They are also forgiving; if you make a mistake, starting over means you’ve only lost a few moves! As well, it’s good practice to learning the cube, so I’ll do the same.
However, some words of advice:
- Do all the plus (or cross) first, THEN add the corners. Trying to do both at once is annoying and more effort.
- Start with the white face. Many examples use that as the beginning, so examples online will be easier to understand. Also, the color positions are more familiar when you start with the same face at all times.
- The cross is done when the edges are oriented right. For example, blue and green are opposite each other. So the edge cube with white and blue MUST be opposite the edge with white and green. Remember that the centers of each side never change – for example, the center white cube is always opposite the yellow one. If you take a cube apart, you’ll see this spindly framework of centers that keep everything together. So you can use that to keep oriented. And it’s much easier if you always start from the same color.
By the way, here’s a simple way to remember face colors – the nearest colors for each are also the farthest away on the cube! For example, red and orange are close together in the color chart, but opposite on the cube. Same for green and blue. And white and yellow are both bright colors, yet opposites on the cube.
 Step 3: Finish the Second Layer.
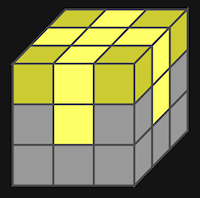
By now, your cube looks somewhat like this:
Note the centers. If you’ve been keeping track of them, they should be like this, or just twist the cube’s center horizontal slice around until they line up.
 Important: Now that we’ve finished the top, we turn the cube over to work on the rest of it. The ‘top’ from now on will be the yellow side, not the white.
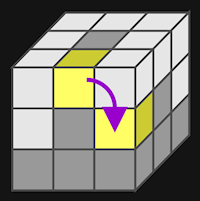
The next step is to add the edge pieces to finish off the second layer. To do that, we use a move to take a cube from the unfinished (yellow) layer/side and put it in the second layer where it should go.
This move is all you need to shift any edge cube into position:
And if things aren’t this simple to do:
- If the cube is already in place, but the colors are reversed, try moving any other edge cube into this spot – it will move this one out AND reverse it, so now you can put it in properly with a second move.
- Likewise, if the cube you want is in another side already, use this move to shift it out, then again to move it into the right location.
- And if the edge cube you want is ready to go in, but the colors are reversed, so it will go in reversed? Move it into place, then move it back out as already mentioned (which reverses it), and then move it back in again.
With this one sequence you finish off the second layer – now the last one.
 Step 4 – Orient the Corners. We want the four remaining unfinished corners to be in the right place. For example, the cube at the corner of yellow, red, and blue needs to have those three colors on it, or it’s not in the right place.
Turn the top layer/slice until at least one corner is in the right place. Now check the other corners:
- They are all in the right location. You’re done for this step!
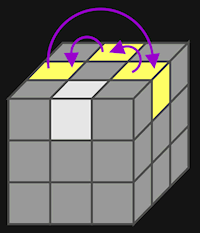
- Two adjacent corners are in the right spot, but two aren’t. Move the whole cube around until the two ‘bad’ corners are facing you, then use this move.
What it does is swap the two corners, and with that move you’re done.
- Two corners are right, but two ‘bad’ ones aren’t, and they are at opposite corners to each other. Same move, but you don’t have to move the cube around – any side will do. Once done, check the top and rotate the layer to match up the cubes. You should now have two adjacent correct corners, and two adjacent wrong – and you already know how to solve that one!
- Three corners in the wrong position. I personally have never seen that (I think it’s impossible on a standard cube), but if it occurs, just select two bad corners so that your swap will put at least one in the correct position. Now, you either will have two adjacent bad cubes, or two opposites, and you’ve covered how to solve either…
 Step 5. Twist the corners. With the top corners in the right locations, now you want yellow on top of each. To do that, we repeat the last step’s move sequence, but always in pairs.
As you noticed, doing Step 4 one time swapped corners, so the second time it swaps them back; but in the process, it twists three of the four corners clockwise by one square.
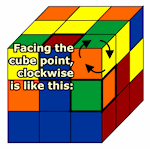 It may be hard to understand, but look at a corner from the tip’s point of view, and you’ll see how clockwise works.
So each pair of these moves twists it one square – do our double step move up to three times, and any corner will have yellow on top.
(By the way, from now on we’ll talk about the single move for Step 5, but you’ll know we’re just referring to Step 4’s move doubled up!)
The catch of course is that they aren’t all oriented the same, so we need different steps for different patterns:
- All four corner cubes have yellow on top – you’re done!
- There’s no corners with yellow on top.
- Any two corners are showing yellow on top.
- There’s one corner with yellow on it.
Let’s look at the the last case. Spin the whole cube around until the yellow corner is at the back left side (this is the ‘protected’ corner, which won’t change). Then do our doubled-up move:
At this point, either the corners are all yellow, or they aren’t – if not, just do the move one more time and they will be!
The trick in this is to look at the corners without yellow on top, and check how many twists they’ll need to get yellow on top. Some will need 1 twist, some will need 2. In the case of the single yellow corner on top, the other squares all needed the same twist (either 1 or 2 twists), so we simply had to do our move one or two times to turn them up.
What about if two yellow corners are showing? Then you have to check the corners individually. In this case, the rule is to PROTECT THE HARDEST, that is, the the corner that will need the most twists to move yellow on top. Protect it (turn the cube so it’s in the back left corner spot), then do the move to twist the corners. After that, check the top again. You should now have a single corner cube showing, which you already know how to handle.
And if no yellow corners are showing? Obviously, you can pick any corner to start with, but you save yourself some time if you do the opposite of the 2 corner solution, and protect the EASIEST corner, that is, the one that needs only one step to change to yellow on top (there might be two like this; in that case, either will do). This way, you’ll get only one yellow corner showing the next move. If you take the hardest corner to protect, you’ll end up showing two yellows, which will take more steps to solve.
Either way, that’s it – the corners are done!
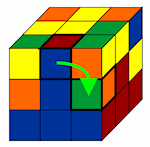
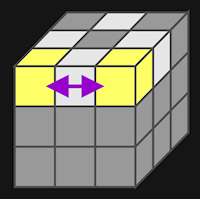
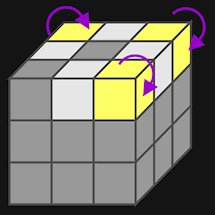
 Step 6 – Shift the Top Edges into place. Now all that is left is the top edge (not corner) pieces. They may be in the wrong location, and also twisted (yellow on side instead of top). For that, here is a move to shift three of them around in a cycle:
The edge nearest you stays where it is, while the other three edges play musical chairs! So to start you need to find the cube that is in the right place, and put that side in front by turning the whole cube.
And if there is no side/edge piece already in the right place? Then do this move on ANY side until one gets into the right place. At most, you’ll need to repeat two times. Then with one in place, move the whole cube so it is in front and finish off the others – again, in two moves or less.
 Step 7 Twist the Edges. A number of times you’ll find yourself done now – but often some of the edge cubes will be twisted wrong.
In that case, you need this solution to twist two adjacent edges. First, turn the whole cube until the two corners that need flipping are lined up with one facing you, and one on the left edge of the cube’s top. Then use this move to flip them (which is a shorter variation of the common move called the Dedmore ‘Fish’ Pattern):
But what if that’s not the problem exactly?
The only other cases are if TWO opposite edges need twisting/flipping, or ALL edges need flipping. For both, the solution is the same: Use this move on ANY side, and then you’ll end up with the familiar two sided problem to solve!
Congratulations! At this point, you can complete any Rubik’s cube. Just refer to this page, follow the steps, perform the moves you need, and you are good to go.
Some suggestions: Just work off the symbols on this page for a while – do NOT try for speed. This solution isn’t the quickest – just the easiest to memorize. Work through it slow and carefully first – a lot – and then worry about speed once you’re comfortable with it (and yes, I’m speaking from experience!)
But of course, you still need to REMEMBER these moves – and maybe a few moves in the future – so let’s talk about memory now, and how to remember these easily. In the next post…