For my next Braille device design, I wanted to mount the main drive motor simply. In the previous design I used several pieces to let it move up, down, and forward/backwards. A lot of pieces, and a pain to keep together in a tight space. So this time I wanted simple.
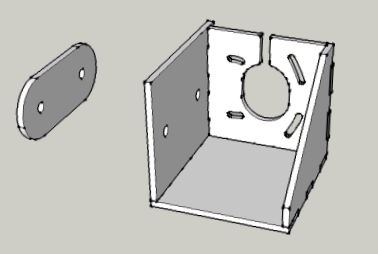
The result is a glued acrylic box that supports the motor, yet allows 2 dimensional movement, as well as fine tuning of the motor in its mount:
Basically, you cut and glue the parts together with ‘crazy glue’ (which is very effective on Acrylic, though be sure you clamp until dry). You then drill large (1″ diameter or so) holes in the material you are mounting into, and screw through it to connect the box and the plastic washer/support on the other side. Use the extra room in the holes to maneuver the motor mount into the ideal location, then tighten the screws to hold it there ( a little double-sided tape might be worthwhile, too).
The advantage is that there is only one side to fiddle with, and the glued box takes care of support.
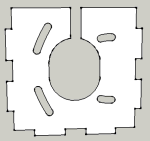
One other detail – the funny slots: 
This design (which will fit a Nema 17 motor, which is about 1.7″ in size), uses slots so I can turn the motor to adjust fine vertical positioning. This design uses twisting to move the motor up or down, as only one position is possible using all four screws for every height position (print it out and try with a real motor).
While I could have used vertical slots to do fine up+down adjustments, I was worried about bolts slipping down – so this design uses somewhat more horizontal slots, hopefully increasing friction, thereby reducing slippage, yet still giving me about 6mm of vertical alignment – perfect for ideal meshing with the rack this motor connects to.
The Sketchup design (available here) is made to work with 3mm acrylic – you’ll have to tweak the edges for other sizes. And of course, the design can be extended as you wish for your motor needs.

