
My friend Oriano Belusic contacted me a few weeks back to build him a Tacit glove, to try it out.
Briefly, the device sends out a sonar ping for distance ranging (actually, two, one for the slightly left of front and another for the slightly right of front) and uses them to register how far the glove is from objects. The result is passed to two servos, each of which pushes a loop of stiff plastic into the back of the hand to register distance via firmer or lighter pressure (imagine being guided by hand squeezes and you get the idea).
Of course, tinkerer that I am, while waiting for the parts to come in, I started wondering what I could do differently. For example, I thought two sonar devices (at $30 apiece) were not necessary, since a blind person could move his/her hand back and forth to get a single reading. Also, although the designer had tried vibration motors and sound and passed on them, I still wanted to give them a go. As well, I wanted to see what could be shaved off in price to make something like this really affordable to others.
The resulting circuit is a low-cost way to translate distance into varying motor vibrations and/or audio frequency change (move mouse over images for descriptions):
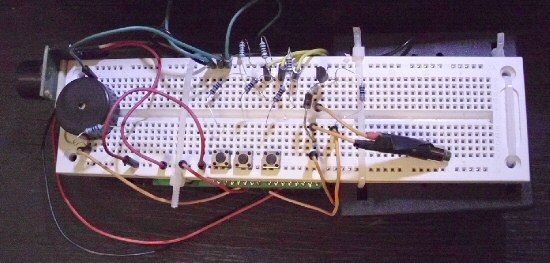
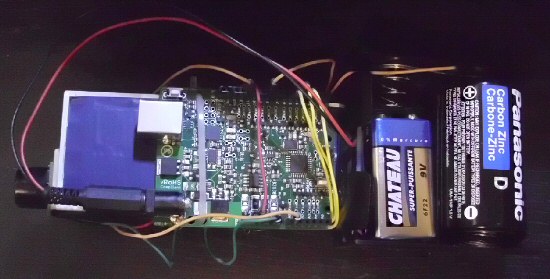
Pretty ugly, but it’s a portable prototype, with a Ruggedino strapped to a D battery case and a breadboard with some nylons straps, and the sonar sensor taped to the front. Ideal for carrying around AND modifying.
Key points:
- The device, when first powered neither chirps nor buzzes. You then press the toggle button to turn on the buzzer (or a speaker, if you add a resistor in series), again to turn on the buzzer, a third time to turn both on, and a fourth to turn them both off, beginning the cycle over (the variable setting g_settings.channelOn in the code determines which setting you start with).
- The other two buttons raise and lower the volume (again, see g_settings.atten in the code for the starting volume, where 0 is the highest and 8 is lowest/off).
- The code is designed to use a Maxbotix LV-EZ1 sonar rangefinder. Besides being cheaper than the Parallax “PING))” (only $25 at Adafruit), it uses a single sensor to send and receive, making for a smaller package (most use two). As well, it’s ridiculously easy to interface – the Arduino can read a value off its AN (ANALOG) pin from 0-511 as a distance value, and can do it about 20 times a second (as per the LV-EZ1 spec sheet).
- The motor circuit is flexible. Working from a motor circuit design I found here, I can power the motor somewhat independently of the Arduino. This means I can use a smaller 9v battery for the Arduino, and a beefier 1.5v ‘D’ cell for the motor (or even leave it off – the Arduino will then only output sound, but that’s still better than failing completely if I have no battery for the motor). The vibration motor was from a solar insect
on eBay (the solar cell powers the motor to make it ‘jump around’ in the bright sunlight). Also, by keeping the power to the motor circuit separate, other motors/batteries could be used without fiddling with the Arduino side of things.
- The audio side is likewise flexible. The original design was to do a pure audio signal as you moved it around, with a higher frequency when in close and a lower one when farther away. For that reason, I adapted some DDS+PWM signal code I found online into a general purpose variable frequency sine wave routine – it required turning off the other interrupts and writing my own timing routines, but the result is an adjustable sine wave that gives audio feedback as you move around. The minimum and maximum frequencies for audio are set in g_settings.freqMin and g_settings.freqMax – note however the background timing is about 30k, so you likely won’t want to set the maximum frequency too much higher. The current design sends the signal from pin 11 to a piezoelectric buzzer. For a cleaner audio signal, connect a speaker and 360 ohm resistor in series to the pin (note: I DO NOT recommend an earphone – the signal is square wave PWM, and I think that’s a rather harsh signal to pipe directly into an ear without some filtering!)
- The vibrating motor is configurable, too. I didn’t like the motor stalling at low speeds, so I set up high and low values for it, from 0-255 (as set in g_settings.motorMin and g_settings.motorMax). While the audio signal uses very fast PWM (pulse width modulation) to synthesize a sine wave (or any waveform you care to drop into the 256 byte waveSampleSine[ ] table) the motor is a simple single PWM signal ranging over 0-255. By setting the low to 40 and the high to 255, I got a wide variety of speeds without stalling and restarting (which is hard on the power supply). This also gives you the option of matching different power supplies and motors, within reason. For instance, if I used the 9v power supply and a 3v max motor, then I could stay roughly at 1/3 of max voltage, or for PWM, 255*(1/3)=85, and the minimum to just above whatever causes it to stall. Of course, if the voltage supply is too high, reducing the pulse widths this way won’t be safe enough, since a high enough intermittent voltage can still damage (take a lightning strike for example; most times, no voltage at all, but then in that instant a very high voltage…). So do this at your own risk.
If you’re interested in building it, here are the circuit diagrams for each part. As mentioned, you can use the g_settings initial values in the code to configure much of the device, letting you play around and get a feel for what works.
|
Motor Driver Circuit
|
Speaker Circuit
|
Trio Switch Circuit
|
| (click any image to enlarge) | ||


Here is the parts list:
- Sonar Ranger (LV-EZ1): From AdaFruit.
- Arduino. I used a Ruggedino, but any Arduino
from eBay will work. For the adventurous, they offer a really small Arduino nano
that’s around $10 – basically, an Arduino on two postage stamps!
- Vibrator motor. You can search for “vibration motor”
on eBay, but the cheapest one I found (about $1.50) was in the body of that vibrating solar insect
- Piezo buzzer. Most any kind will do – I got the fancy piezo buzzer
in the photo from off eBay. You can also use a speaker, but remember it needs a resistor in series, unlike the piezo.
- Switches. I used the breadboard kind
here, but if you want real switches, you can check eBay for decent deals on nice pushbutton switches
.
- Breadboard. I’ve had spotty results with eBay breadboards, but you can always use either breadboard/PCB (“perfboard”)
, which is cheap.
- Resistors. You can look up specific resistor types and buy them, but you can also buy a selection as well across multiple ranges (just search eBay for “resistor assortment” or “resistor lots”
)
- Transistor. An inexpensive 2N3904 NPN transistor
worked fine, and can be found everywhere (including eBay of course).
- Diode. Like the transistor, I used a very generic one, the 1N4004 rectifier diode
.
- Battery holders/connectors. If you decide to go for a specific battery holder
, they can be handy – I used my dual ‘D’ cell to hold a single one for the motor, and the spring in the other side helped keep my 9v battery secure. And for the 9v, you’ll want a 9v to Arduino plug
.
And of course, here is the SonarEye code for the Arduino (or you can download the .zip file here)
/*

 SonarEye Audio/Vibration Ranging Code - Tone Freq. and Motor speed output

 Copyright © 2012 - David Pankhurst

 */

#include "avr/pgmspace.h"
// i/o pins - note that most can be changed except for 11, which is tied to interrupt
#define PIN_AUDIO (11)
#define PIN_MOTOR (8)
// button controls
#define PIN_BTNUP (5)
#define PIN_BTNDN (4)
#define PIN_BTNTOG (3)
// analog in/out
#define PIN_SONAR_ANALOG (0)
#define PIN_SWITCH_ANALOG (1)
// volume
#define TOT_ATTENUATION_LEVEL (9)
// full sine wave in 256 samples
PROGMEM  prog_uchar waveSampleSine[256]={ 127,130,133,136,139,143,146,149,152,155,158,161,164,167,170,173,176,178,
  181,184,187,190,192,195,198,200,203,205,208,210,212,215,217,219,221,223,225,227,229,231,233,234,236,238,239,240,
  242,243,244,245,247,248,249,249,250,251,252,252,253,253,253,254,254,254,254,254,254,254,253,253,253,252,252,251,
  250,249,249,248,247,245,244,243,242,240,239,238,236,234,233,231,229,227,225,223,221,219,217,215,212,210,208,205,
  203,200,198,195,192,190,187,184,181,178,176,173,170,167,164,161,158,155,152,149,146,143,139,136,133,130,127,124,
  121,118,115,111,108,105,102,99,96,93,90,87,84,81,78,76,73,70,67,64,62,59,56,54,51,49,46,44,42,39,37,35,33,31,29,
  27,25,23,21,20,18,16,15,14,12,11,10,9,7,6,5,5,4,3,2,2,1,1,1,1,1,1,1,1,1,1,1,1,1,2,2,3,4,5,5,6,7,9,10,11,12,14,15,
  16,18,20,21,23,25,27,29,31,33,35,37,39,42,44,46,49,51,54,56,59,62,64,67,70,73,76,78,81,84,87,90,93,96,99,102,105,
  108,111,115,118,121,124};
// button results - indexes in array for entries
#define BUTTON_UP (0)
#define BUTTON_DN (1)
#define BUTTON_TOG (2)
#define TOT_BUTTON (3)
byte g_button[TOT_BUTTON];
unsigned long g_buttonStartTick[TOT_BUTTON]; // when button first pressed currently or 0 if up/released
// note there is a lot of integer rounding here; however, we are not looking for precise frequencies, so ok
#define CLOCK_RATE_HZ ((F_CPU)/510)
#define MSEC2TICKS(msec) ((msec)*(CLOCK_RATE_HZ/1000))
//-----------------------------------------------------------------------------------------------
//  our interrupt communications routines int to main code (i2m), and main code to int (m2i)
//-----------------------------------------------------------------------------------------------
// interrupt values passed back to main code
volatile int g_i2mI=0;
struct s_i2m
{
  unsigned long tick;
} volatile g_i2m[2] = { { 0 }, { 0 } };
// main code -> interrupt info
volatile int g_m2iI=0;
struct s_m2i // main code values passed to interrupt
{
  unsigned long freqOffset;
  byte motorRate;
  byte channelOn; // 1-audio; 2-motor 3-both
  byte atten; // 9 volume levels for now
} volatile g_m2i[2];
//-----------------------------------------------------------------------------------------------
//  settings
//-----------------------------------------------------------------------------------------------
struct s_settings // info to save
{
  unsigned short freqMin, freqMax; // freq, not offset!
  byte motorMin, motorMax; // 0-255 pwm value
  byte channelOn; // bit0-motor on/off; bit1-audio freq on/off
  byte atten; // level - currently from 0 (full) - 8 (silence)
} g_settings = { 200,4000, 40,255, 0, 4 };
//-----------------------------------------------------------------------------------------------
inline unsigned long GetTick(void) { return g_i2m[g_i2mI].tick; }
//-----------------------------------------------------------------------------------------------
ISR(TIMER2_OVF_vect)
{
  static unsigned long phaseAcc=0;
  // handle audio
  int i=g_m2iI;
  phaseAcc=phaseAcc+g_m2i[i].freqOffset;
  unsigned long value=pgm_read_byte_near(waveSampleSine + (phaseAcc >> 24));
  value = value >> g_m2i[i].atten; // 9 levels for now, 0-8
  static int audioOff=0;
  if ( 1 & g_m2i[i].channelOn ) // audio?
  {
    OCR2A=value;
    audioOff=0; // for next time audio goes off
  }
  else if ( 0==audioOff )
  {
    OCR2A=0;
    audioOff=1; // so we don't keep coming in here
  }
  // update tick now using inactive struct
  i=1-g_i2mI; // set up next pass
  g_i2m[i].tick = g_i2m[ g_i2mI ].tick + 1; // update ticks
  g_i2mI=i; // and switch over
  // now the motor - take curr value, and turn on/off pwn as needed
  static int checkPWM=0;
  byte tickLSB=g_i2m[i].tick;
  // if the motor is not on, we have to deal with (possible) cleanup for transition
  // easiest solution is to force end of cycle, and never restart - we use tickLSB for this
  if ( 0 == (2 & g_m2i[i].channelOn ) ) // no motor?
    tickLSB=255; // force second half of if() below, in order to turn off curr signal (if any)
  if ( 0 == tickLSB )
  {
    // start cycle
    digitalWrite(PIN_MOTOR, HIGH);
    checkPWM=1;
  }
  else if ( checkPWM && tickLSB>=g_m2i[i].motorRate )
  {
    checkPWM=0; // skip from now on undtil cycle over
    digitalWrite(PIN_MOTOR, LOW);
  }
}
//-----------------------------------------------------------------------------------------------
//-----------------------------------------------------------------------------------------------
unsigned int readEcho(unsigned long *value)
{
  // get signal in - 0-1023 as per analogRead(0) (scale if necessary)
  // we limit how often we check - return success and value in 'value' or 0 and no change to value...
  static unsigned long oldTick=0;
  unsigned long newTick=GetTick();
  unsigned long deltaCheck=MSEC2TICKS(55);
  if ( newTick-oldTick>deltaCheck || 0==oldTick )
  {
    oldTick=newTick;
    unsigned long dataIn=analogRead(PIN_SONAR_ANALOG);
    *value=dataIn;
    return 1;
  }
  return 0;
}
//-----------------------------------------------------------------------------------------------
void readButtons(void)
{
  // get button values into arrays - this allows button checking
  // to be strightforward in program, by hiding details here
  static unsigned long oldTick=0;
  static byte buttonPrev[TOT_BUTTON];
  unsigned long newTick=GetTick();
  unsigned long deltaCheck=MSEC2TICKS(30); // debounce value - check just this often
  if ( newTick-oldTick>deltaCheck || 0==oldTick ) // time to check?
  {
    int i=0;
    if (0==oldTick) // first time?
    {
      for (i=0;i<TOT_BUTTON;++i)
        g_button[i] = buttonPrev[i] = 0;
    }
    oldTick=newTick;
    // now check each for down and compare against prev
    int pressed[TOT_BUTTON];
    pressed[BUTTON_UP]=digitalRead(PIN_BTNUP);
    pressed[BUTTON_DN]=digitalRead(PIN_BTNDN);
    pressed[BUTTON_TOG]=digitalRead(PIN_BTNTOG);
    for (i=0;i<TOT_BUTTON;++i)
    {
      g_button[i]=buttonPrev[i];
      if ( pressed[i]!=buttonPrev[i] )
        buttonPrev[i]=pressed[i];
      // check our time values
      if ( g_button[i] && 0==g_buttonStartTick[i] )
        g_buttonStartTick[i]=newTick;
      else if ( !g_button[i] && 0!=g_buttonStartTick[i] )
        g_buttonStartTick[i]=0;
    }
  }
}
//-----------------------------------------------------------------------------------------------
void loop()
{
  unsigned long k=0, freq=0, motorRate=0, total=0;
  // we'd like to smooth samples, so we store last ones here, avg, and use that
  byte smoothing[5];
  int smoothI=0, totSmoothing=sizeof(smoothing)/sizeof(smoothing[0]);
  int m=0;
  int channelOn=g_settings.channelOn;
  int atten=g_settings.atten;
  while(1)
  {
    readButtons();
    // manage switching for now
    static unsigned long switchTickTOG=0;
    if ( g_button[BUTTON_TOG] && g_buttonStartTick[BUTTON_TOG]!=switchTickTOG ) // new press?
    {
      switchTickTOG=g_buttonStartTick[BUTTON_TOG];
      channelOn=(channelOn+1)&0x3;
    }
    static unsigned long switchTickUP=0;
    if ( g_button[BUTTON_UP] && g_buttonStartTick[BUTTON_UP]!=switchTickUP ) // new press?
    {
      switchTickUP=g_buttonStartTick[BUTTON_UP];
      if (atten>0)
        --atten;
    }
    static unsigned long switchTickDN=0;
    if ( g_button[BUTTON_DN] && g_buttonStartTick[BUTTON_DN]!=switchTickDN ) // new press?
    {
      switchTickDN=g_buttonStartTick[BUTTON_DN];
      if (atten<TOT_ATTENUATION_LEVEL-1)
        ++atten;
    }
    if(readEcho(&k))
    {
      int i=1-g_m2iI; // set up in inactive struct
      // the sensor is rated from 0-511 - in reality, getting higher than 255 in a room
      // is rare and really not needed so we clamp to 255, without scaling
      k=k&0xFF;
      // and reverse - higher values mean farther away, so lower frequency out
      k=255-k;
      freq=(((g_settings.freqMax-g_settings.freqMin)*k)>>8)+g_settings.freqMin;
      g_m2i[i].freqOffset=(freq<<16)/((unsigned long)CLOCK_RATE_HZ);
      g_m2i[i].freqOffset=g_m2i[i].freqOffset<<16;
      // now translate value into motor range
      motorRate=(((g_settings.motorMax-g_settings.motorMin)*k)>>8)+g_settings.motorMin;
      g_m2i[i].motorRate=motorRate;
      g_m2i[i].channelOn=channelOn; // 1-audio 2-motor 3-both 0-neither
      g_m2i[i].atten=atten;
      g_m2iI=i; // switch over
    }
  }
 }
//-----------------------------------------------------------------------------------------------
#define cbi(sfr, bit) (_SFR_BYTE(sfr) &= ~_BV(bit))
#define sbi(sfr, bit) (_SFR_BYTE(sfr) |= _BV(bit))
//-----------------------------------------------------------------------------------------------
void setup()
{
  Serial.begin(9600);
  //  pinMode(PIN_SCOPESYNC, OUTPUT);      // sets the digital pin as output
  pinMode(PIN_AUDIO, OUTPUT);
  pinMode(PIN_MOTOR, OUTPUT);
  // disable all other interrupts but #2
  cbi (TIMSK0,TOIE0);
  sbi (TIMSK2,TOIE2);
  // ...and set up #2 now
  sbi (TCCR2B, CS20);
  cbi (TCCR2B, CS21);
  cbi (TCCR2B, CS22);
  cbi (TCCR2A, COM2A0);
  sbi (TCCR2A, COM2A1);
  sbi (TCCR2A, WGM20);
  cbi (TCCR2A, WGM21);
  cbi (TCCR2B, WGM22);
}
//-----------------------------------------------------------------------------------------------
This device is meant to be a starting point, letting people experiment with audio and vibration output for ranging. I’ve found it interesting to use to walk around my home with my eyes closed, and see what the feedback is like. I think it has a real benefit, and I’m talking more with Oriano to see what direction we could take it in (I even have a name for it already – the “SonarEye”).
Ideally, I’d like to replace the Arduino with an ATTiny85, but haven’t had the time to ‘burn’ one. In fact, I can see getting the device down to flashlight size, and letting people attach it to their cane, hold it in their hand, or strapped to their hand, doing roughly what the Tacit Glove does, but at under 1/2 the cost.
In any case, I hope this information is useful to everyone, and I hope it spurs you to try it out and even improve it – after all, there is a huge market of Blind people you could help out with a device such as this!
is it use arduino nano for tacit project much better than arduino mini ???
I think you could use either the Arduino Mini or the Arduino Nano in it – the Nano includes a serial port, which makes updating it much easier. However, once you’ve finished the designs, you don’t need the serial port, so the Mini is a slightly cheaper and smaller way to build it.