Hello World! (Or, How To Transfer + Setup A WordPress Blog for 2016) Part 2

In part 1 we got a site ready to move – now it’s part 2, and the transfer:

  • Snap it all. This time to make things easier, I did screen shots of every page in every section in WordPress admin I had made changes in. In Windows, select the window, use Alt-PrtScn to snap a shot, then select and open Irfanview’s window, and Ctrl-V to paste in it. Then click the Save As button on top to save as a snap. I set aside a directory, and just kept increasing the file names by 1. Later, Irfanview will let you scroll through these snaps easy, making compares simple. Of course, if any page has data in it, like long text, then I copied and pasted that into a text file with a note so I could find it again (and save THAT file frequently!)
  • Export your blog’s posts. ‘Nuff said – you don’t want to enter them again. Although one time I did help recover a client’s site from cached Google pages, I wouldn’t recommend it…
  • Change your site/Change your nameservers. You have the data, you have the blog entries, you have the nuts and bolts, time to go. Set up your domains on your new host, and point your blog’s nameservers to your new site. I also like to put a simple file on each domain so I know when I’m looking at the new (index.html, saying something like ‘be back soon’).
  • Say goodbye to the old. This is the hardest part. The new site will appear quite quickly online as everyone sees the new nameserver entries (called DNS propagation). However, with the old sites active, there’s still some online give and take (technical term). What this means is you might be switched to the old site from time to time. The easiest (but most painful) solution is to shut down the domains on the old cPanel. A trick: Go into FTP, and rename the blog’s directory or move the files if possible, and then close down the site on the (now empty) directory. This keeps the files handy just in case…
  • Email ahoy (or, swab the poop decks). Until DNS propagates, you’ll likely be looking at the old site (or nothing). This is a good time to set up your email accounts from the old site, so they transfer properly. Also, use this time to dig into cPanel and copy over more settings. I find flipping through the old and new email sections in cPanel the easiest way, so that I remember forwarding, redirects, catchalls, and other settings. You might also want to do this for cron jobs (if any), and other cPanel settings that affect your site. Also, remember to clear your browser cache and (possibly) reboot your machine to help get it unstuck from the old site. Once that happens, and you’re looking at the new, you should be good to go on.
  • Say hello to the new. Install WordPress. Likely, you’ll need to set up a new MySQL database, or perhaps you have a setup system like Fantastico to do most of it for you. No matter what, you should end up with that plain vanilla ‘Hello World’ site (or sites).
  • Upload anything needed. This is where you rebuild the site outside of WordPress: any file directories, your upload directories, and so on. Basically, anything outside of the usual WordPress install, and just about anything within the WordPress /wp-content/ directory is needing a restore or rebuild. What you copy and what you reinstall (like plugins and themes) is up to you. For example, I copied plugins of my own, downloaded the ones I could from the WP plugin site, and filled the /uploads/ directory from my backups (with the exception of /cache/, which is a caching directory that the Super Cache plugin will rebuild). In my case, two problems: As I mentioned, my wife’s blog was missing most of the uploads directory (which made me glad I didn’t delete the old site’s directory when I killed it!), and I had trouble getting the NextGen Gallery plugin to work. In the end, I copied the gallery images to the same location in /wp-content/ they used to be in, activated the plugin, then went in and (via phpMyAdmin) removed the relevant SQL tables (xxx_ngg_gallery, xxx_ngg_pictures, and xxx_ngg_album, where xxx is the table prefix for the blog), and replaced them with the originals from the old site. I still had to re-add albums to my posts, but at least the images transferred without me needing to reenter all 120+ images!
  • Set up everything BUT the posts. It may sound counter-intuitive, but if for example you don’t have your pictures transferred, then the posts will look funny, so save them for last. I installed all the plugins, then called up Irfanview, and scrolled through all the screen shots, matching old settings to the new install. The end result was everything synced except the data…
  • Call in the posts. Now you can import the posts. Oddly enough, this is not a builtin feature with WordPress anymore, so you’ll have to download the plugin first, then import. If everything exists, you should be OK, but of course, expect error messages. In my case, I got errors for every image I didn’t export (didn’t need to, since they were in the /uploads/ directory I copied already).
  • Verify. Go through as much as you can, double-checking. Verify the new site looks right.
  • Backup. Make sure you backup the new site – just in case. It’s easier to restore from a configured new site than the old one you had to tweak. Besides, backups are cool, right?

That’s about it. Likely, you will find many, many other items cropping up when you do your transfer, since every site is a little unique. If so, my apologies for not being able to cover your specific situation; I mainly wrote this to keep track of it for my next transfer, since I was caught yet again, even though I transferred a year ago (my issue was DNS propagation, and I forgot I had to kill the old site or my browser would sometimes go there instead of the new – which made for some weird errors).

In any case, I don’t recommend a transfer lightly. However, sometimes it’s worth it – for me, it was 80% off of Hostgator’s rates for three years, meaning I won’t have to move again until 2018 at the earliest (I hope), and so won’t have to think about WordPress transfers until then…

…which is why I wrote this – hope it helps you not think about WordPress as much as possible, too.

Hello World! (Or, How To Transfer + Setup A WordPress Blog for 2016) Part 1

Yes, you’ve all seen it at the completion of a successful WordPress install:

Welcome to WordPress. This is your first post. Edit or delete it, then start writing!

Right up there with calling me ‘skippy’ during the install, it ranks as some of the most common verbosage in WordPress – every blog has one, and every blog (should) get rid of it ASAP.

In my case, I thought I’d piggyback off it in discussing my latest endeavor in transferring my blogs to Hostgator after a year away (I was at Namecheap – better deals, so I switched). I’m writing these down to remember the details for the next transfer I do, but hopefully you can benefit from them as well:

  • Get your tools ready. Filezilla is my FTP program of choice. I used cPanel on both sites, in particular the file manager and its compress/expand options for files (this allowed me to upload one WordPress zip file, copy it to each blog, and unzip it, all much faster than uploading each individual php file via FTP). If you’re not comfortable with them, research a tutorial, open it up and try it out before the big day. PHPMyAdmin is another, as well as cPanel’s email section, to name a few. As well, I used Irfanview for screen shots, but any screen clipping program will do (more later). And of course 7-Zip is the all purpose army knife for compressed file slicing and dicing. And if you think you might be working with the SQL database, the text files are huge, and I have had good success using psPad with them over the years (watch out for adware if you download the latest, however).
  • Keep things straight. For awhile, you will be working between hosts, with different cPanels (if you’re using them) and different site locations. Love your browser tabs, and open as many as you need. Better yet, open two separate windows, and keep the old and new apart. Otherwise (as I found), you might end up making changes to the old site it doesn’t need, and not making them to the new! Likewise, set apart a section on your file system using Explorer where you will work, with separate windows for old site and new site directories.
  • Check your email often. Any email left on your old site will have to be viewed by a web browser after you’re done – so to minimize it, I check frequently before the final closedown.
  • Backup, backup, backup. cPanel has an option to backup the whole site. Do so. Download it. Then get another copy. Use 7-zip to test that the file is valid (some zips can be damaged during download). I also like to unpack the whole site locally to make sure it’s a valid download. It also keeps files handy in case I need to upload a missing item.
  • Assume nothing. cPanel backups are complete, right? No. One directory (uploads) in my wife’s blog was almost entirely missing. I’m guessing packing up large pictures might be the issue, but I don’t know. So assume nothing, and check all the backups by opening them.

All ready? Then on to part 2, the transfer…

The Dirt On Hand Soap

We use it on a daily basis (or should), yet how many understand what exactly is in it?

The reason for this post is that this year we decided to evaluate our soap needs, and try to stay away from animal products. And in doing so, I learned a bit more about how soap is made. The result has changed my soap purchasing forever – and if you think I’m being overly dramatic, think again after you’ve read this…

At its simplest, soap is a molecule that is oil-attractive at one end, and water-attractive at the other – so using it, we can combine water and oil (sorta) allowing us to wash away both – a rare case of oil and water mixing…

This magic happens when fats are combined with sodium hydroxide (lye). Nothing else is necessary, although typically colors and aromas are added, and of course, fancier versions are possible by using fancier oils (coconut, olive, etc.)

At its simplest, soap is a balance of lye and fats/oils. Too much lye in the soap is caustic, which is dangerous. So soap makers err on the side of too much fat, which means not all fats are consumed in the chemical reaction.

Sometimes this is great. Called superfatting, a recipe might deliberately have way too much oil so some of it remains to provide a richer experience. But even at its simplest, some of the original fats will remain in a soap recipe for safety.

But what if that fat is animal based?

  • Animal lard or tallow is a traditional way to make soap – no problem, unless you’re a vegetarian. Then the idea of rubbing animal fat on your skin that you wouldn’t put in your mouth seems a bit hypocritical.
  • Even if you’re not a vegetarian or vegan, the quality of the lard leaves much to be desired. After all, if the lard is high quality, why wouldn’t it be sold to restaurants like McDonald’s? Although I have no proof, it seems to me that the lard that makes its way to soaps is unlikely to be the ‘top drawer’ animal fat.
  • Finally, even if I’m wrong, and it’s the best animal fat possible, it’s still rubbing animal fat into your skin.

Of course, this may not worry most people, which is fine. But it worried me, so we made some changes. In the end, rather than making my own, we experimented with Method brand soap (which advertised being environmentally friendly and non-animal) for hands at the sink, and vegetable-based oil soaps for showering. And while it’s not scientific, I believe the result has been cleaner and better-smelling skin after a wash.

Another interesting fact: We are actually using less soap. It turns out those soaps that float in water do so because they entrain a lot of air in the mix – so you’re actually paying for less soap. In contrast, the dense blocks of soap we’ve been buying last a lot longer, which means that while at first they are much more expensive, in the end it’s much closer to equal (not that price is the deciding factor – now that we are limiting ourselves to vegetable-based soaps, Gwen has found a specialty soap that is so good we order it over the Internet – called Hint of Mint, it includes Oil of Peppermint, as well as Peppermint leaf – and smells radically better than the ‘peppermint’ we get in most commercial products).

So please take a moment to consider that the average bar of soap is part lard. It may not make a difference to you, but it it does, consider a better bar. I firmly believe the quality of food we put into our bodies affects us a great deal – and the quality of what gets in via our skin can have an effect as well…

I Did It! Clean Boot/Dual Boot The Free Upgrade Of Win10 – But You May Not Want To…

As I mentioned in an earlier post, I had planned to install Windows 10 on a new directory, with the free install, and failed.

And although the plan now is reportedly to provide a version for next month that will allow this I decided to give it another try.

Short answer: You CAN clean boot a new copy of Win10 using your old OS free upgrade offer, AND dual boot to the old one and Win10 both.

Long answer: You really, really will not want to. It is time consuming, tedious, filled with little ‘gotchas’ that will have you pulling out your hair, and frankly the end result isn’t worth the aggravation (I have to test software on Win10, so I’m stuck).

Enjoy misery? Then abandon hope, all yea who continue reading:

  1. I had a spare Win8.1 directory I never used, as real programmers all do (real programmers use the oldest operating system available when developing, Win7). After my Win7 install failed (fortunately, as I – and you – are soon to find out), I decided my nearly-new install of Win8 should work fine. From there, once Win10 was installed, and my key was validated, I could do a clean install on a new partition, and then restore Win8.1 to the way it was.

    ‘Before’ Me was so naive…

  2. I thought it was overkill, but decided I’d backup the Win8.1 directory (tip for everyone – install Windows on a one smallish partition, and keep all your data on another partition. Then you can blow away Windows anytime you want and keep all your vital docs, files, etc. It’s time-consuming to set up, but in my years of programming, I’ve never encountered a better trick for working with Windows). For the backup, I used Macrium Reflect, free for personal use. Since Win8.1 was fairly pristine, the backup was fast.
  3. From Win8.1 I ran the setup from the USB I had (made via the Media Creation Tool from MS). One tip: Make sure the version/bit size matches your install – in my case, I could use ‘Pro’ and 64 bit. Don’t forget, for an update you run it from within Windows.
  4. After a bit of questioning (skip the key entry – always!) the install went along. Bring a book, game or find something else to do – I lost track of time, but altogether hours will pass…
  5. Eventually, I was done. I checked Win10 (via Setting/Updates) and it said I had Windows installed – great. According to all I had read, this now licensed my computer to the Win10 copy, so I was good to go. On to the clean install.
  6. For the clean install, I had a new(ish) drive that was waiting for it. I put the USB in, rebooted, and then went to my computer bios menu (or whatever it is called these days), and selected to boot from USB. It started the install, allowed me to pick a partition, and after some (a lot of) time, failed with a message “Windows 10 cannot be installed to this disk. The selected disk has an MBR partition table. On EFI systems, Windows can only be installed to GPT disks.” OK, I was using an older drive, so maybe my other drive (where I had just placed Win10) would work (note to self: I apparently have an EFI system).
  7. So, I then spent a long, long time finding room on the drive. Copying files over to the other disk, and then using Disk Management to shrink and move around partitions. After literally spending decades on it until I had a biggish partition ready for clean Win10 install…
  8. …and it failed with the same message. Back to Google (isn’t there a bit of irony in using Google to solve Microsoft’s problems?) And I finally found a note that the way the USB boots determines the media it installs on. I dug around and was finally able to find a boot selection from my BIOS that booted it the ‘other’ way – and that did the trick. Not only that, but my original disk choice could now be used for the install. Sure, the messages seemed downright naggy, like what I was using my computer for (and it again asked for the license key, which I continued to skip), but it went ahead and did a proper, verified (via Settings) install.
  9. Now with Win10 finally done, I could restore Win8.1 via the recovery option. And it chugged along restoring – until the message “We’re sorry, but you can’t go back. The files we need to take you back to a previous version of Windows were removed from this PC” Now I don’t think they were really sorry, just smarmy (like they’d been all along); plus all the files were still there (Windows.old, $Windows.~BT, $Windows.~WS, etc), but they say no, so it’s no. Most of the Internet told me the problem was I had passed my 30 day window, but everything was less than a day old. My guess? The second install ‘tweaked’ things – whether deliberate or not I cannot say (though I have my suspicions) – to make sure I couldn’t roll back.
  10. But thanks to Macrium, MS was thwarted. I restored that partition to Win8.1 via the backup, booted into it, then booted to Win10 and Win7 to confirm all was well. It was, with one little detail: The boot manager still showed Windows 10 in the menu for Win8.1, so I had to use bcdedit to VERY carefully rename it to Win8.1 again.

And that’s the tale. It is possible to clean boot without losing your old OS on the free offer – kinda. I actually lost it thanks to MS, but because of backing up, I was fine after. I cannot emphasize enough to back up beforehand, and set up multiple partitions for your OS, so you can easily plan for this. And this is a testimonial to the fine folks at Macrium – great tool (and if you ever want a review – contact me).

Hear Those Ohms: An Audible Multimeter for the Blind (PART 2)

I already posted awhile back about my audible multimeter project for the blind – for those thinking of doing something similar, here’s some more details:

mutimeter for blind shot 1

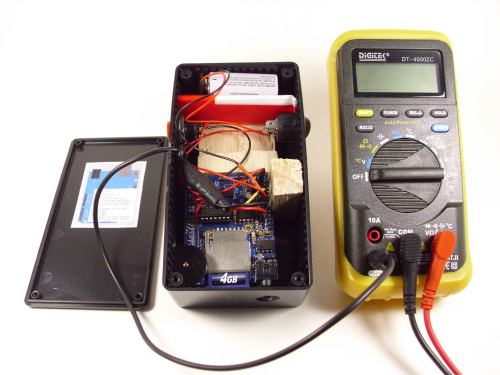
The finished device hooked up to meter. On the right side is the power button; on the left is the ‘speak’ button. The front has the Arduino with the Adafruit wave shield on top. At back is the 9v battery. The middle is two pieces of (poorly) carved balsa, which hold everything in place. The larger piece is glued down, and prevents the Arduino from shifting back, as well as providing a ‘notch’ for the battery to rest; the smaller removable piece has a notch in it to keep the Arduino from shifting up (the lid in turn keeps the block in place). As I said previously, balsa is the poor man’s 3D printer…

multimeter for blind shot 2

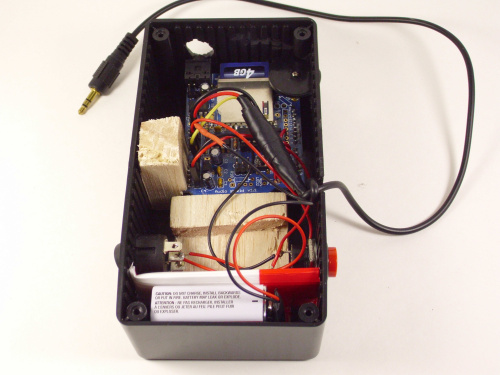
From this angle, you can see the notches in each balsa piece better, as well as the ‘helper’ for the battery. The balsa notch was a bit loose in this one, so I inserted a folded piece of corrugated plastic, which stays in place with a thumbtack and the backs of the two switches. My second version didn’t need the plastic sheet, as I whittled the battery notch better.

multimeter for blind shot 3

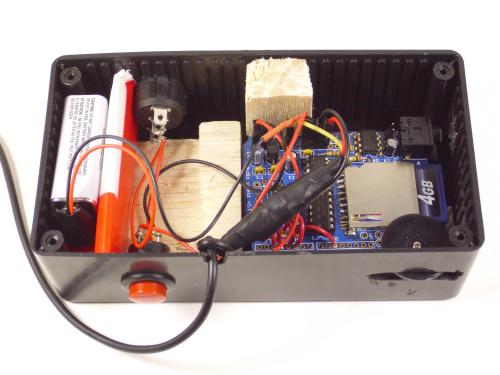
Near the upright removable block you can see the DuPont cables plugged into the Arduino via the Wave Shield. Using these connectors made the device easier to assemble, since I could solder everything together and test it outside of the box, then assemble and plug it together afterwards (notice the graphic on the lid in the first picture; that’s the plug layout for the Arduino in case any of them should come loose). The separate wiring ‘harnesses’ I had to solder ended up being the battery/power switch, the speech button, and the RS232 signal cable.

multimeter for blind shot 4

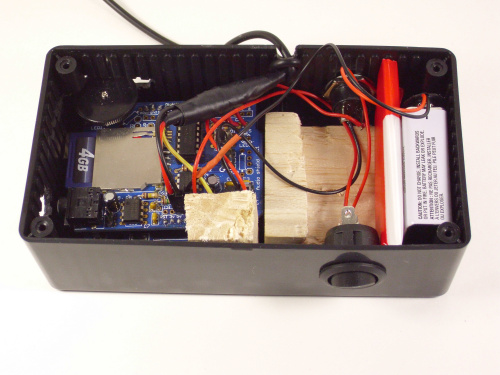
One last shot, showing the memory card for the audio, and at the far side, the notch for the RS232 cable. Putting a knot in the cable just before the case’s hole made it a poor-man’s strain relief – hopefully!

All in all, the project was quite interesting. It gave me some practice in project building – especially soldering, since the Wave shield was my first ever soldering kit project. And while a bit rough, the important thing is that it works – and opens the door to my friend once again tinkering with all things electronic…

What Is Bitcoin, And What Is (Possibly) Wrong With Bitcoin?

Bitcoin is often in the news. An ‘independent’ money source, it seems to ignore borders and free up money for the darker sides of the Internet, giving criminals an easier way to pay for things.

On the other hand, some people have been using it in legitimate money-making enterprises, speculating on the rise and fall of its values like any other real-world currency.

So is Bitcoin bad? That’s like asking is the Euro bad, or the American Dollar. In fact, those examples are closer than many realize: Because when you ask if the Dollar is bad, you need to look at fundamentals behind it – so let’s do the same for Bitcoin.

To explain Bitcoin and the potential problems, I’d like to introduce you to Shane.

Shane is a precocious kid who is just contrary – the kind that if you say the sky is gray, he replies with ‘well, actually, the sky is blue’ and so on. If you say the day is cold he says ‘Hot’ and so on. Eventually, talking to him is just seeing what he’ll say to be contrary:

Green? Aardvark.
Building? Rolling.
Truth? Wefgfqaojf. (Shane likes to make up words, too).

And so on.

We all know a kid like Shane.

But Shane is consistent despite being annoying: Every time you say ‘green’ to him he comes back with “aardvark,” or for “truth”, “wefgfqaojf”

He’s so consistent that in fact someone decides to use this for security. This person (we’ll call him the Gamemaster) involves you and Shane in a game, and gives you some rules:

  1. You get a word, and you have to add another word to it of your choice. So no more ‘green’ – now it’s ‘bangle green’ or ‘saturday green’ or who knows what. This makes it more complicated, because you can’t keep a list of choices in your head – there’s just too many possibilities.
  2. You give this double-word message to Shane, and get his reply.
  3. You then take the first letter of whatever he replies. If it begins with A through M, you score a win; otherwise it’s a loss if it begins with N through Z. This works because oddly enough, Shane doesn’t try to be silly and give you all Z words – he’s just as likely to give you an answer beginning with “A” as “Z”, or “W”, or “T”.
  4. But there’s the catch: You really have no idea what he’ll say, so you have to talk to him a lot to get an answer that works. So you say to him “green 1”, “green 2”, “green 3”, “green 4”, and so on, to get an answer that begins with A-M.
  5. Oh, and a penalty rule from the Gamemaster: You have 10 minutes maximum to win, but if you get a right answer too quickly, the rules for answering get tougher – to keep it challenging of course. For example, let’s say you get a “G” answer for a win in only five seconds. The next game you might need to find a word beginning with A-D, with E-Z being a loss. You ace that, and now the rule changes to “A” only, and so on. Keep it up, and you might need to find a word beginning with “AAAAA” to win, otherwise you lose (and since Shane’s replies are sometimes gibberish, “aaaaasffsiahji” is as likely as “aardvark.)
  6. Fortunately, the opposite happens as well: If you don’t get a win in time, the next rounds of guesses might have an easier range to win with, like back to A-M, or from A-T.
  7. And because the obvious way to play is to avoid a penalty for the next round, and answer at the maximum time of 9:59, a little more pressure: Other people are playing, and there can be only one winner (turns out a lot of people have their own Shanes.)

So let the games begin:

  • The Gamemaster gives you the word ‘bright’ – you say to Shane ‘bright 1’ he says ‘nskaoble’. ‘N’ is no good, and you lose.
  • Now you try ‘bright 2’ he says ‘qoqujser’. ‘Q’? You lose.
  • Again and again you try. Finally you get to ‘bright 129’ and he says ‘ceaofy’ – ‘C’ works, you win, and the round is over. But you did it too fast, so the next round needs the correct answer to begin with A-F instead of A-M.
  • Next round, you get “sdijk” so you dutifully ask Shane “sdijk 1”, “sdijk 2”, “sdijk 3”, and so on. You struggle for 10 minutes but fail. The next round will now require from A-T for a win, to make it a bit easier.
  • Round 3: The word is “qofk”. And someone in Singapore using her version of Shane answers with “qofk 24832″=”eroalmf” and wins the round. And because she was very, very quick, the winning letter range tightens up again to just A-B!

Of course, to play a game like this in the real world with a truly consistent “Shane” is not possible. Eventually, he’ll tire out, or maybe forget he said ‘aardvark’ for every ‘green’. But his computer equivalent, called the SHA256 algorithm, doesn’t tire out. Every time you ‘ask’ SHA256 a question like:

0110101111101001101101001101110111011010111111010111010011000101011101011110100101011101101100110110111110111101010001111010110111111011100101011001000110110100001010100101110110000010001010011100100110110011100011001101011101111000010100011001100111011011

It comes back with an answer like this:

0110110011011110001001111101101000010000110000111011101011000010000000010110001100011110111110001101000011000100001000010100000000110000010000011001100001011111010001111101101110010011010001110011011001111101110111111010010010111000101011010000111000000100

And instead of A through G, it’s more like the number of zeroes at the front. Guess too quickly, and you’ll need more zeroes in front for a correct answer next round. But if everyone takes too long, next round you can win with less zeroes (with Bitcoin, this rule ‘adjustment’ happens once every 2016 rounds, or about 2 weeks).

So Bitcoin works like this:

  • You get an outside package of data, which you add your guess onto – the result goes to ‘digital Shane’ to get back an answer. If the answer qualifies, you win, and get a few bitcoins for your trouble. If you lose, you try again. And you have 10 minutes per round. And other people are doing it too. And some have really fast computers that can ask questions really fast (process the SHA256 algorithm quickly).
  • Also, just like guessing Shane’s replies, guessing what the SHA256 will respond with is in practice impossible (there are 2^256 possible answers, or about 1.2*10^77, and only a few are ‘wins’). So you ask, and ask, and ask again, as fast as you can. So, it’s no wonder that Bitcoin creation (called ‘mining’) uses powerful computers.

So, sound like a game you’d like to play? Then get started, because there also another rule: A deadline to Bitcoin itself. Unlike ‘real’ money, the supply will capped at 21 million.

This deadline affects another aspect of Bitcoin. That random word you’re given to start with? Not so random. In fact, it’s part of the data used by Bitcoin itself. So all the calculations and guesses you are doing are tied into the security of Bitcoin. What happens when fewer and fewer people do the guessing, and eventually stop? Bitcoin will eventually enact a transaction fee for processing, which will help the situation, but who enforces the fee – and like many things on the Internet, will the fee go down towards zero? At some point, a transaction will depend on a computer doing the work – and computers (unlike digital ‘bits’) aren’t free.

In the real world, currency is tied to a country, and they are free to print more money (making inflation happen, of course). Bitcoin is going through an inflationary period now, but what happens in the future? We’re talking about a world-wide currency that will never increase in amount, something unheard of in this modern age. It’s expected the value of it will grow as it is used more and more – but there has been a lot of financial speculation in the world of late, and a lot of screwed up countries to show for it.

How will countries feel about it? Around the world American dollars were tightly controlled since they often undermined the local currency. Nowadays this is less so, but what about Bitcoin? Will laws eventually be enacted to enforce its use? For example, here in Canada you have to declare outside monies earned. How do you declare a Bitcoin? And what valuation do you use? If it gets profitable, countries will not shy away from taxing it.

Another issue: I talk about Shane here to explain the key to the whole Bitcoin process, the SHA256 algorithm. If someone were to come up with a faster way to calculate it (not just a little but a lot faster) they could corner the Bitcoin market, since the right guesses would get harder and harder to get until only they could play. In the world we have currency speculators who try to make ‘runs’ on real world money, which can number in the hundreds of billions or trillions – with Bitcoin’s cap of 21 million could this be managed more easily? Fortunately, an exponentially faster SHA256 is not likely – if it was, not only would Bitcoin suffer, but our entire economy, which depends on algorithms like this to manage all our financial transactions, Bitcoin or not (stay tuned for quantum computing, however, which is expected to break all this – someday.)

Currently, the future for Bitcoin does look bright. More and more people are hearing about it and trying their ‘luck’ at it. But one somewhat more reliable way to success is in what I call selling shovels. This refers to gold miners of bygone eras, where a few people became insanely wealthy panning for gold, while most went broke; but others got consistent riches selling pans and shovels to all the miners. Whether you go for the huge win or the consistent ‘selling shovels’ route (or avoid Bitcoin altogether) is your choice – but expect to hear about it for quite some time…

Free Upgrades, Microsoft ‘Free’ Upgrades, And Windows 10

(With apologies to Samuel Clemens).

As part of this week’s goal to move into the 2010s, it was time to listen to the nagging Windows 10 icon and schedule an upgrade from Win7.

So I did what I’ve done for every Windows revision: Made a blank partition on my hard drive (in this case, a second hard drive), and began the install.

By the way, why is it Windows allows you to create a new logical partition in the visual Disk Management console, but to make an extended partition you need to go to DOS (sorry, Command Prompt!) and use diskpart?

Only this time, it went – odd. My first clue was that it didn’t go through the usual interrogation at the beginning for where and how I wanted Windows. No problem, says I, it’s just taking awhile copying files.

Then it started rebooting, something I wasn’t expecting until after the install had begun. By then it was dawning on me that Windows WASN’T going to ask where to place it, and that it was going to overwrite my current Windows.

Fortunately for me, the install failed (apparently MS servers were too busy). By then I had used my tablet to find out the awful truth. As stated on this page:

Warning: If you want to upgrade to Windows 10 for free, you need to use the Upgrade this PC now option. [MY COMMENT: ‘Upgrade this PC now’ ONLY upgrades over the previous OS] If you haven’t upgraded to Windows 10 yet and perform a clean installation, you’ll need to enter a product key or buy a license in order to activate Windows 10.

To sum it up:

  • The upgrade IS free for previous Win7/8 Users for the most part – but only if you replace your old OS with it.
  • To install it on another partition, you need a Win10 key – and there seems to be no free upgrade key for that.

Could I be wrong? Possibly, but so far, I’ve yet to see a post after Win10 was released by someone who successfully dual booted Win10 on the ‘free’ offer.

Simply put, if I want to keep Win7, and have Win10 run as a separate bootable OS in a separate partition, I’ve seen no way to do it with the free version.

Therefore, the free upgrade is more of a free wipe and reinstall, and the separate partition upgrade I’ve counted on for decades is now no more – without even a hint of its loss (unless you dig deep on the MS site, of course.)

For most people I suppose this is fine. And for Microsoft, it moves all the sheep into a single OS pen, making tech support easier. But for me, I need to test on older Operating systems (Win7 is expected to be viable until 2020) and replacing it just won’t do. And being told I had a free upgrade when in fact I’ll now have to buy a copy for $150 or $250 is rather galling (hence the Mark Twain quote for the title).

More disturbing however was rumblings on the Internet that Win10 was the last, and versions after it were going subscription based. So sometime in the future we might only rent Windows, at a price I’m sure we’ll enjoy paying over and over.

Additionally, There is something called UEFI (Unified Extensible Firmware Interface) which will control the boot system. While stated that it is to prevent boot-level viruses, it has what I’m sure is a completely unintended side effect of making dual boot systems (like Linux) difficult to create, as well as wiping Windows and installing another OS on newer hardware using UEFI.

The result: Every upgrade I’ve debated moving to Linux. Now I’m really considering it. After Steve Balmer left, the apparent opening of Microsoft (releasing .net source, for example), made me think that it was a brave new world (and friendlier) at MS. But this sly bait and switch with the install tells me it will never change. That this goes on at a time when desktop use is waning, I find incredible: I actually (and somewhat reasonably) thought they would make their OS completely free and focus on tools like Visual Studio and Office to make their money.

Therefore, I think it’s time to ask myself what will I be programming on in 20 year’s time? For paying customers, of course, Windows will always be an option (I’ll write for the Commodore 64 if the money is good…) But the idea of locking in your computer to a steadily changing OS that serves a corporation’s needs first, and yours second, is rather disturbing to me. And with the many options out there now, such as Linux, FreeBSD, and the handheld operating systems, it seems the secure money can be somewhere else.

In the near future, however, I’m staying far away from it until I can safely add it alongside my other operating systems.

Of course I may be overreacting, and perhaps I’ll soon install Win10 and be done with Linux until the next upgrade.

But then it occurs to me that if anything bad happens to MS, there’s no key validation, and no new installs of Windows – ever. And while few people plan for computing after a world-wide Armageddon, I can’t quite get that thought out of my head.

Suddenly Linux looks like a really good option…

(Update: Oct 15 – this article mentions that the latest Win10, due Nov, will allow keys from 7 and 8.1 to activate – I hope so…)

(Update: Oct 15 Success! It can be done – see here)

Hear Those Ohms: An Audible Multimeter for the Blind

A friend recently had a speaking multimeter fail on him, a relic from the olden days when Radio Shack (remember them?) sold neat stuff. Being blind, it was not just a curiosity, but a vital tool for taking electrical measurements.

Fortunately, he had heard about some work using Arduinos to read display data from specific multimeters, as discussed here. In that project, they grabbed the RS232 data output from the meter and converted it into audio.

So I built one, with a few changes, of course:

  • I wanted a simpler (less custom) design, so I opted for the Adafruit Wave shield, which plays audio on a SD card. This made the playback very simple.
  • Of the two ‘lower-end’ meters considered likely to work with this (Digitek’s DT-4000ZC and TP4000ZC) I was able to get the Digitek with a USB connector, not an RS232 port (which would require an RS232-to-USB adapter from eBay as well).
  • Because I could connect directly via USB, it was straightforward to write a VB.net program to read the port and test out the audio. This let Oriano pick the features that worked best, and let me try out some usability ideas (like press to announce, and press and hold to announce repeatedly).
  • For packaging, I ended up with a large project box, almost as large as the meter itself. For that, I turned to the poor man’s 3D printing, balsa wood and JB Weld, and carved a couple of inserts to keep everything in its place without shifting. That and a judicious use of corrugated plastic sheeting, and I even had a battery holder.

The end result is a nice black ‘brick’ which announces the meter settings depending on whether you press (one time announce) or press/hold the button (repeated announcing). Simply plug in headphones (or a powered speaker) and get audio updates of readings – which is handy not just for the blind, but for anyone needing their eyes somewhere else other than on the meter display…

Note: part 2 continues with more construction details.